So. Ich hatte gestern etwas Zeit und habe mal einen intensiven Test gemacht. Dazu hab ich meine Ursa + diverse Tiffen Filter benutzt.
Zusammenfassung. Das Plugin ersetzt definitiv keine echten Filter. Nicht einmal ansatzweise. Ist es deshalb schlecht? Nein.
Aber wenn man es mal Side by Side mit echten Filtern vergleicht kommt doch Ernüchterung auf.
Erst einmal stimmen die Angaben wie 1/4 usw. gar nicht. Die echten Filter haben ganz andere Stärken. Man muss bei Hazy schon eher verdoppelt um in eine ähnliche Stärke zu kommen.
1. Das Plugin zerstört das Highlite Weiß.
highlites.PNG
Wie man sieht musste ich um auf die selbe Stärke zu kommen wie der echte Filter die Intensität erhöhen. Nur addiert Hazy halt dann Farbinformationen auf das Weiß, also wird es grau. Kann man anschließend in einem Node danach sicherlich fixen. Aber wenn man es übersieht oder nicht hinbekommt....doof.
2. Filter soften deine Lensflares
lens.jpg
Wie man sieht zaubern die Filter aus der hässlichen Lichtquelle eine schöne Lichtquelle.
Egal was ich an Hazy gedreht habe, da kommt man nicht einmal ansatzweise hin. Klar...manchmal will man es vielleicht clean. Aber dann würde ich auch kein Hazy drauf hauen.
3. Das Plugin rettet kein Moire.
Durch die Softness von Filtern kann man Moire vorbeugen.
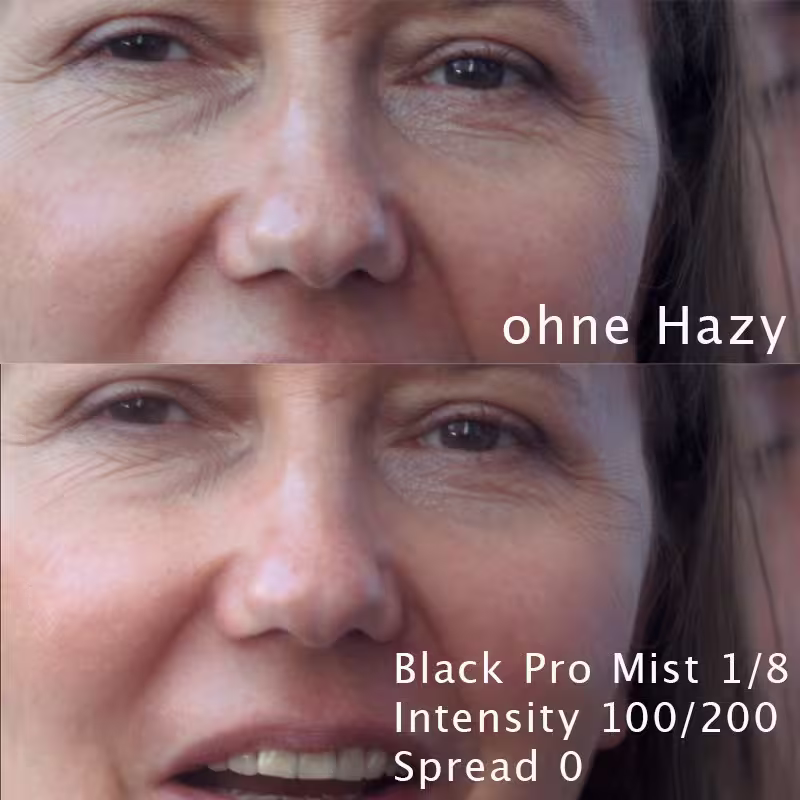
4. Das Plugin macht keine Softness.
Das finde ich mir am ernüchternsten. Denn es soll doch da sein um die Digitale Schärfe zu reduzieren. Aber es macht das Bild 0,0% softer. Es entnimmt etwas Kontrast. Ja. Aber die schärfe bleibt. Da hätte es noch einen Slider für geben müssen.
Denn dafür sind die Filter ja da. Kleine Hautfältchen weich zu nehmen und überschärfung aus dem Bild zu ziehen.
Das macht das Plugin aber so gar nicht. Also muss man sich dafür auch noch mal einen seperaten Node bauen.
Zusammengefasst. Für mich ist das Plugin eher ein Glow Plugin als ein echtes Mist Plugin. Nicht mehr und nicht weniger. Ich finde den Glow gut. Aber das sie mit ihren Filter Presets werben ist meiner Meinung irreführend.
Das Plugin macht das Footage jedenfalls nicht Analog oder entnimmt ihr den Digitalen Look.
-paleface- hat geschrieben: ↑Mi 04 Dez, 2024 10:16
Das Plugin ersetzt definitiv keine echten Filter. Nicht einmal ansatzweise. Ist es deshalb schlecht? Nein.
Sehe ich alles genauso.
Ebenso kann man mit keinen Programm irgendwelche Objektive simulieren kann und echten VHS Look bekommt man auch nur mit original VHS.
Muss man halt entscheiden, wie wichtig einem die Kontrolle ist in der Post.
Ich finde echte Filter einfach besser als das Hazy Programm.
@paleface
Erstmal vielen Dank für deine kritischen Tests.
-paleface- hat geschrieben: ↑Mi 04 Dez, 2024 10:16 1. Das Plugin zerstört das Highlite Weiß.
Wie man sieht musste ich um auf die selbe Stärke zu kommen wie der echte Filter die Intensität erhöhen. Nur addiert Hazy halt dann Farbinformationen auf das Weiß, also wird es grau. Kann man anschließend in einem Node danach sicherlich fixen. Aber wenn man es übersieht oder nicht hinbekommt....doof.
Es wäre ja, wie mit anderen Analog-Simulationen (z.B. Halation), auch logischer, es so zu behandeln, als wäre es in das Footage eingebacken (wie bei einem BlackProMist). Ich bin nicht am Rechner, aber gab‘s da nicht einen Slider im Sinne von Highlight-Recovery?
-paleface- hat geschrieben: ↑Mi 04 Dez, 2024 10:16 Für mich ist das Plugin eher ein Glow Plugin als ein echtes Mist Plugin. Nicht mehr und nicht weniger. Ich finde den Glow gut. Aber das sie mit ihren Filter Presets werben ist meiner Meinung irreführend.
Das sehe ich jetzt ähnlich.
Na und? Im Fernsehen wird ja auch alles wiederholt ...
Frank Glencairn hat geschrieben: ↑Mi 04 Dez, 2024 11:26
Ich kann da weitgehend alles damit machen, was ich will - IMHO ne reine Einstellungssache.
Ich fand bei meinen Testungen die Ergebnisse nicht ansprechend, und so kompliziert ist das Hazy Plugin nun wirklich nicht. Zumal fehlt die softness, muss man kombinieren mit anderen Plugin und ich finde es zu teuer, für das was es bietet.
Es gibt auch im Film Look creator so eine Haze Funktion und Glow gibt es auch, und Glow find ich fast besser als Hazy convert. (Obwohl ich beide nicht wirklich nutze).
Da ich aber echte Filter kenne in der Praxis, achte ich da auch mehr auf Unterschiede.
Scherzkeks...wenn du nicht das Ergebnis eines echten Filters daneben hälst, bekommst du als Ergebnis natürlich ein schönes Bild! :-D
Die Diskussion ist aber ob es einen echten Filter ersetzt. Und das macht es halt nicht. Der echte Filter liefert ein anderes Ergebnis. Was man jetzt mehr mag. Das ist natürlich jedem überlassen.
Deine Kerzenmitte hat übrigens auch einen Grauschleier.
Ich nenne das jetzt mal so...ist vermutlich nicht der richtige Begriff.
Dein Hero hat ein Glow im Gesicht. Weils halt ein Glow Plugin ist und kein echtes Mist Plugin. ;-)
-paleface- hat geschrieben: ↑Mi 04 Dez, 2024 11:02@Axel
Meinst du das Tone Mapping? Da bekomme ich am Ende auch kein richtiges weiß mehr hin.
Also wenn >Exposure nicht enabled ist, dann ändert sich gar nichts an den Highlights. Wenn es enabled ist und du >Tonemapping auf 5:00 stellst, gibt es keinen weichen Verlauf mehr zwischen geclippten und noch nicht geclippten Highlights, was ja irgendwie der Idee des Filters widerspricht. Was Qualify darunter tut, weiß ich gar nicht. Ändert sich irgendwie nichts. Aber Weiß wird bei mir nicht Grau (wenn man von diesem Halo-Artefakt bei Tonemapping absieht. Das geclippte Weiß bleibt Weiß).
-paleface- hat geschrieben: ↑Mi 04 Dez, 2024 10:16 4. Das Plugin macht keine Softness.
Das finde ich mir am ernüchternsten. Denn es soll doch da sein um die Digitale Schärfe zu reduzieren. Aber es macht das Bild 0,0% softer. Es entnimmt etwas Kontrast. Ja. Aber die schärfe bleibt. Da hätte es noch einen Slider für geben müssen.
Denn dafür sind die Filter ja da. Kleine Hautfältchen weich zu nehmen und überschärfung aus dem Bild zu ziehen.
Doch. Es nimmt sehr stark digitale Schärfe von brutzeliger Haut weg, und das schon bei geringer >Intensity bei 1/4 BlackProMist. Der Effekt geht so ziemlich gegen Null, wenn du >Spread auf 100 stellst.
Na und? Im Fernsehen wird ja auch alles wiederholt ...
@paleface
Ich habe übrigends keine Bilder gepostet ("Deine Kerzenmitte", "Dein Hero")
Ansonsten hat ja niemand was gegen Tests, sie sollten bloß mit einem Minimum an Verständnis ausgeführt werden.
Und du siehst nicht, dass man Schärfe reduzieren kann, dass man die Exposure einstellen kann, dass das Weiß nicht plötzlich zu Grau wird etc.
Soll ich sagen: ho, ho ho, das ist aber ein toller Test?!
Wahrscheinlich ist das ein Fall von, "mit der Arbeitsweise, die mir besser gefällt, komme ich zu den Ergebnissen, die besser gefallen."
Beides hat sein Berechtigung und Sinnhaftigkeit.
Nur für mich machen echte Filter halt ein bisschen mehr an "Spirenzien", die ich bei dem Digital Tool vermisse.
Vielleicht bin ich da auch zu detailverliebt.
Klar sollte man, wenn man eine Kirche anmietet, mit Crew und DarstellerInnen, nicht heimlich einen Mistfilter draufschrauben und dann die Editing-Kollegen mit einem "besonders schönen eingebrannten Look" überraschen.
Absprache ist natürlich extrem wichtig und im Zweifel bin ich bei Spielfilmprduktionen ganz klar auch der Meinung - so viel wie möglich/alles in der Post. Nur ich mache kein Spielfilm.
-paleface- hat geschrieben: ↑Mi 04 Dez, 2024 12:30
Was ihr als Blur seht ist halt Glow. Also ein Verlauf von Highlites. Aber kein Blur.
Das würde ich auch so wollen. Idealerweise möchte ich in der Post Blur, Diffusion und Kontrast alle getrennt einstellen können. Effektiv, d.h. visuell, nehmen physische Mistfilter ja auch immer Kontrast weg.
Na und? Im Fernsehen wird ja auch alles wiederholt ...
-paleface- hat geschrieben: ↑Mi 04 Dez, 2024 12:30
Was ihr als Blur seht ist halt Glow. Also ein Verlauf von Highlites. Aber kein Blur.
Das würde ich auch so wollen. Idealerweise möchte ich in der Post Blur, Diffusion und Kontrast alle getrennt einstellen können. Effektiv, d.h. visuell, nehmen physische Mistfilter ja auch immer Kontrast weg.
Sag ich auch nix gegen. Ich sag aber das die mit den Eigenschaften von Glasfiltern in einem Plugin werben. Und da gehört nun einmal auch ein Blur dazu. Das macht das Plugin nun einmal aber nicht.
So. Nun bin ich erst mal raus. Muss noch einen Film schneiden und graden. Vielleicht setze ich sogar Hazy dabei ein.
Naja, ne optische Illusion ist es nicht, ist messbar. Allerdings sehe ich das nur bei Ausgangswerten von 255, die werden sozusagen nach unten weicher gemacht. Werte unter 255 nach oben.
Ich versteh diesen Weg.
Man kann dem mit der Exposure auch entgegenarbeiten.
-paleface- hat geschrieben: ↑Mi 04 Dez, 2024 10:16
Wie man sieht zaubern die Filter aus der hässlichen Lichtquelle eine schöne Lichtquelle.
Egal was ich an Hazy gedreht habe, da kommt man nicht einmal ansatzweise hin.
Hmm, bei dir scheint etwas nicht richtig zu funktionieren. Windows + DaVinci?
"Deine Zeit ist begrenzt. Verschwende sie nicht damit, das Leben eines Anderen zu leben"
(Steve Jobs)
-paleface- hat geschrieben: ↑Mi 04 Dez, 2024 10:16
Wie man sieht zaubern die Filter aus der hässlichen Lichtquelle eine schöne Lichtquelle.
Egal was ich an Hazy gedreht habe, da kommt man nicht einmal ansatzweise hin.
Hmm, bei dir scheint etwas nicht richtig zu funktionieren. Windows + DaVinci?
roki100 hat geschrieben: ↑Mi 04 Dez, 2024 23:29
Ich finde er zeigt gut was alles damit möglich ist.
Etwas oberflächlich. Hier der Start-Guide von FilmConvert (speziell für Resolve):
Getting Started
When you first apply Hazy, a watermark will appear over your footage until it has been activated with a license. If you have purchased a copy of Hazy, you can use your FilmConvert account to login and activate the plugin.
Instead of using traditional FilmConvert camera packs, Hazy allows you to select the specific profile (gamma) of your footage. This means that you can select from a camera specific profile (log or non log), a color-managed workflow such as ACES and DaVinci Intermediate, or even HLG or PQ.
This also allows you to place the effect before your view node (in a scene referred space) or after the view node.
Primary Controls
To begin using Hazy, first select the Manufacturer of your camera. If you are not grading with a camera specific gamma, there are also options for common workflows.
Next select the Input Gamma of your footage.
* If you have non-log footage, you can select one of the “Standard Gammas” (Rec.709, Gamma 2.4, etc) or you can select a Manufacturer specific profile as well, for example: Fujifilm Standard / Provia. These selections will give you a tonemapped output.
* For log footage, you can choose the appropriate manufacturer log space, if you are applying Hazy directly to the camera footage or if your timeline settings match the camera log space.
* For HLG or PQ footage you can select “HDR” in the Manufacturer selector, then one of the options, HLG (tonemapped), HLG, PQ (tonemapped) or PQ. You can use these options for HDR footage from the camera or with an HDR timeline.
* For ACES or Linear workflows select the “Other” manufacturer option. For DaVinci Intermediate, select the “Blackmagic Design” manufacturer option.
Next, you can select the Filter Style you wish to use. These are a series of presets based on our favorite styles of filters.
If you want a stronger Bloom effect for strong light sources, select the Bloom Filter Style. If you wish to smooth any uneven skin tones, then use the Smooth filter style.
The Filter Strength selects the size of the filter to determine how strong your mist will appear. Selecting a smaller size such as an Eighth will result in a more subtle, tight effect around strong light sources. Selecting a large size such as One will result in a more spread out, diffused effect over the whole image.
The Intensity slider controls the strength within the bounds of the size of the selected filter. This is the overall blend of the effect.
The Spread slider controls the overall spread of mist in your image. Adjusting the slider to the right will result in a softer and more spread out mist, which appears over the whole image.
Customize Response
When applying Hazy to your clip, you will see a small pop-up window appear (similar to the Grain Response curves in FilmConvert Nitrate), with different nodes to help you get your desired Mist look. These help carve the shape of your diffusion roll off.
There are multiple different mist node types that affect the image differently and interact with each other in different ways. These can be identified by the shape they draw on the graph. Generally speaking, moving a node to the right controls the size of your mist, while moving the node up can control the intensity of your mist. The middle control point will set the strength and distance of the effect “in between” the other control points, or the main falloff of the effect.
Each filter style has up to three nodes used to achieve their different effects. Experiment with adjusting the node positions to achieve different variations on the preset styles, or adjust the Spread slider at the bottom to scroll through our presets for the selected filter style.
White Balance
The White Balance controls allow you to push the overall color of the effect in a certain direction. You might wish for the mist to be warmed up or cooled down.
Moving the Temperature slider to the left results in your mist having a cooler, more blue tone. Moving the slider to the right will make your mist have a warmer, orange tone.
The Tint slider adjusts the color tint of your mist. Moving the slider to the left will add a green tint to your footage, whereas moving the slider to the right will add more magenta to your image.
Saturation
The Saturation controls allow you to adjust the overall saturation of your mist effect. Enabling this toggles the saturation controls on or off.
The Saturation slider controls the saturation of your mist and how vivid it will be. Moving the slider to the right results in a more vibrant and intense saturation, which can pair nicely with Halation.
The Color Averaging slider takes the average color value from surrounding pixels. This is to be used if the effect is not picking up the saturation due to it being mostly white.
The Qualify slider controls what parts of your image are affected by the above saturation controls. Move to the left to control only highlights, or to the right to affect down to middle gray.
Exposure
Enabling the Exposure controls allow you to adjust the exposure values of your highlights.
The Exposure slider adjusts all three channels (R,G,B) by plus or minus 5 stops. Use this slider to increase or decrease the exposure of the mist effect without introducing a color shift.
You can also use the Red, Green, and Blue sliders to either increase or decrease the exposure of each individual channel to introduce a small or large color cast to the effect.
The Tone Mapping slider can be used to increase or decrease the contribution of the tone mapping stage, and you can optionally disable the tone mapping completely if need be with the Enable toggle switch.
The Qualify slider controls what parts of your image are affected by the above exposure controls. Move to the left to control only highlights, or to the right to affect down to middle gray.
Halation
The Diffusion map is a visualization of where the mist is being applied in your image. This view might look a bit strange at first, but it shows the color difference between the input image and the modified image. Where the Diffusion Map is bright, the image has been modified a lot (relatively speaking). Where it is dark, or even black, none or very little modification of the image has been made.
Etwas irritierend: Halation. Falsches Plugin wohl.
Na und? Im Fernsehen wird ja auch alles wiederholt ...
Um die Unterschiede zwischen den verschiedenen Filtern und ihre Eignung für das gewünschte Ergebnis einschätzen zu können, könnte man mit der Karikatur anfangen. Filter Strength: One. Und dann runtergehen.
Na und? Im Fernsehen wird ja auch alles wiederholt ...
roki100 hat geschrieben: ↑Fr 06 Dez, 2024 21:45
Was ist original ProMist Filter 1/4 und was ist Hazy?
A
J.jpg
B
Bildschirmfoto 2024-12-06 um 21.56.21.jpg
interessante Schachstellung....
Ja ist sich recht ähnlich, müsste raten.
Aber das ist kein typischer Einsatz, den ein echter Filter ausmacht. Und es gibt so viele Filtertypen.
Wie gesagt, wer solche Postarbeit mag, tolle Sache. Und bestimmt auch professioneller, weil man in der Post das Bild entscheidet.
Das Vorgehen mit so viel wie möglich vor der Kamera zu entscheiden, finde ich interessanter und ich möchte Spaß haben bei der Arbeit. Ich überlege gerne Tage vorher, welche Kamera und Objektive etc. ich bei einem Dreh einsetze, anstatt zu sagen sigma 24-70 geht immer, der Rest in der Post.
Ich spare auch Zeit, weil ich weniger editieren muss.....
Jeder, wie er mag. Man hat heute einfach mehr Möglichkeiten. Und Hazy kostet weniger im Vergleich zu guten ProMist-Filtern (1/2, 1/4, 1/8). Diese Vielfalt und die Entwicklung finde ich spannend :) Ich liebe filmische Looks, die sich bei mir als "cinema" festgesetzt haben...und weil ich das supi finde, könnte ich mir entweder eine echte Filmkamera mieten, oder ich greife lieber zur digital weiterentwickelten, günstigeren Option: CineMatch, CinePrint35, FilmConvert … und ja, auch so etwas wie Hazy. Das scheint tatsächlich etwas zu sein, das die Film-Emulation ergänzt oder vervollständigt. :)
"Deine Zeit ist begrenzt. Verschwende sie nicht damit, das Leben eines Anderen zu leben"
(Steve Jobs)
Jeder, wie er mag. Man hat heute einfach mehr Möglichkeiten. Und Hazy kostet weniger im Vergleich zu guten ProMist-Filtern (1/2, 1/4, 1/8). Diese Vielfalt und die Entwicklung finde ich spannend :) Ich liebe filmische Looks, die sich bei mir als "cinema" festgesetzt haben...und weil ich das supi finde, könnte ich mir entweder eine echte Filmkamera mieten, oder ich greife lieber zur digital weiterentwickelten, günstigeren Option: CineMatch, CinePrint35, FilmConvert … und ja, auch so etwas wie Hazy. Das scheint tatsächlich etwas zu sein, das die Film-Emulation ergänzt oder vervollständigt. :)
Billiger ist es bestimmt als echte Filter.
Aber wie Du auch sagtest, jeder mag es anders, man muss halt im Vorwege überlegen und/oder abstimmen.
Und die Post Ersparnis lasse ich mir auch gerne gefallen.
Denke aber, daß solche Plugins gut florieren, und das bestimmt aus gutem Grund.
Die Feinjustierung ist das tolle, wie z.B. die Verschiebung von R, G oder B, WB usw.. Diese Anpassungen wirken sich je nach ausgewähltem Filter unterschiedlich aus was wirklich toll ist. Man kann solche Änderungen auch mit physischen Filtern erzielen, aber das wäre mir zu teuer. Zudem hat Boris gelehrt: je mehr Filter man anschraubt, desto stärker leidet die Bildqualität, es sei besser, gar keinen Filter zu nutzen.
"Haze" (Volumetric Lighting) finde ich interessant (ist bei Hazy dabei). :)
"Deine Zeit ist begrenzt. Verschwende sie nicht damit, das Leben eines Anderen zu leben"
(Steve Jobs)
@ roki
Besser ist sehr relativ.
Besser ist für mich ohne Filter vor allem darum, weil ich von solchen Mist Filtern keinen blassen Schimmer habe, wann welchen, wie zu nutzen. Und daran würde Hazy auch nix ändern. Höchstens zum herumspielen anleiten und so die Bilder noch deswegen zu verhunzen.
Und das wird bei dir roki auch nicht sein.;)
Darum lass ich mal schön vorläufig die Finger davon. Ich habe genug andere fürs Bild viel wichtigere Baustellen.
Apropos Fog
gerade bei Nebel ist es so wenn man das echt macht, lernt man erst wie eine Nebel Maschine richtig einzusetzen. Mit Hazy eben nicht.
Mit anderen Worten, man lernt es ohne Hazy auf die brutale Art, weil man kann in Post gar Nix mehr ändern.
Gruss Boris
Zuletzt geändert von Darth Schneider am So 15 Dez, 2024 05:02, insgesamt 4-mal geändert.
Rechtliche Notiz: Wir übernehmen keine Verantwortung für den Inhalt der Beiträge
und behalten uns das Recht vor, Beiträge mit rechtswidrigem oder anstößigem Inhalt zu löschen.